Disabling unnecessary pre-installed apps, often referred to as “bloatware,” can help improve the performance and storage space on your device. The steps to do this can vary depending on the device and operating system you are using. Here’s a general guide for commonly used operating systems:
Android Devices
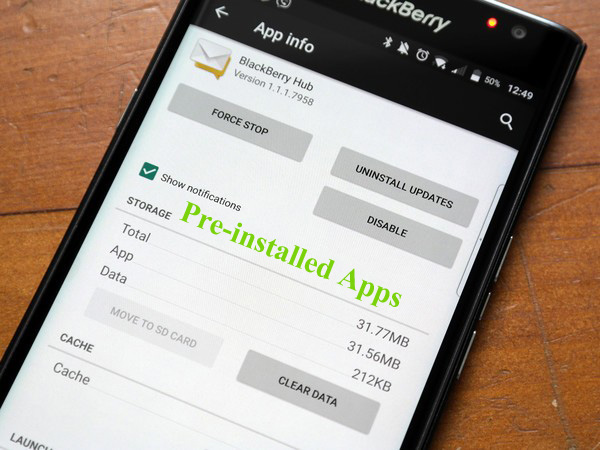
- Open Settings: Go to your device’s settings menu.
- Applications or App Manager: Look for an option like ‘Apps’, ‘Applications’, or ‘Application Manager’.
- Find the App: Scroll through the list to find the app you want to disable.
- Disable the App: Tap on the app and then select ‘Disable’ or ‘Force stop’. Some system apps cannot be disabled.
iOS Devices
Disabling pre-installed apps on iOS is more limited compared to Android:
- Touch and Hold: Touch and hold the app icon on the home screen.
- Edit Home Screen: Tap ‘Edit Home Screen’ or something similar.
- Remove App: Tap the ‘minus’ symbol on the app you want to remove. This won’t uninstall the app but will remove it from the home screen.
Windows PCs
- Start Menu: Go to the Start menu.
- Find the App: Locate the app you want to remove.
- Uninstall or Remove: Right-click on the app and choose ‘Uninstall’ or ‘Remove from list’.
Mac Computers
- Finder: Open the Finder.
- Applications: Go to the ‘Applications’ folder.
- Move to Trash: Drag the app to the Trash, or right-click and select ‘Move to Trash’.
Tips
- Check Compatibility: Make sure that disabling an app won’t affect the functionality of other apps or the system.
- Updates: Sometimes, updates re-enable disabled apps.
- Rooting or Jailbreaking: Some apps can only be completely removed by rooting (Android) or jailbreaking (iOS), but this is risky and can void warranties.
Remember, while you can disable many pre-installed apps, some core system apps are essential for the functioning of your device and cannot be disabled.